Search This Blog

Showing posts with label making jewelry. Show all posts

Sunday, June 27, 2021

Cicadas!

 Much to the envy of bug watchers everywhere, the DC area was recently a focal point for the emergence of Brood X cicadas!  This brood of cicadas emerges only once every 17 years, so for a bug event, this one was big.

As anyone who has ever lived with me can attest, I'm not really a bug person.  Cicadas, though, are one of the few bugs I actually do like.  They don't bite or sting, they're too big to fly into your eye or up your nose, and I'm fascinated by the varieties that spend years at a time underground.

The coverage of their 2021 emergence started many weeks ahead of time.  There was much hand-wringing by people who lived in the area in 2004, when they last emerged, and didn't enjoy them that time.  They were delayed in emerging due to a snap of unseasonably cold weather, and when they finally did, I was pretty underwhelmed and disappointed at first.  For all the coverage, I was expecting a Big Event, and I felt like I was mostly seeing a few stray wings on the ground.

They picked up as time went on, though.  I never felt like they were that numerous where we lived, but they were very thick on the ground (and in the sky and the trees) near one of the schools where I worked.  Walking to the bus stop at the end of the day made me feel like I'd gotten a true cicada immersion experience, between the deafening humming as I walked under trees, and cicadas actually landing on me from time to time.

Here are a few pictures to commemorate Brood X of 2021, along with a cicada necklace I made to welcome them in style!


Thursday, June 11, 2020

Some New Jewelry!

Finally, a post that has nothing to do with the pandemic!  Well, except for the fact that all this time at home is giving me plenty of time to think of hobbies, of course.  I was working on photographing some jewelry for a side hustle I'm working on, and thought I'd take a few pictures of some recent makes just for fun.

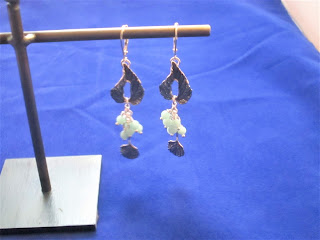
I was inspired to make this first piece by a pictures I saw online of vintage silver earrings.  The earrings looked like grape leaves with clusters of silver grapes dangling freely.  (Unfortunately, I haven't been able to find the exact image to share).  I realized that remaking those earrings would be pretty challenging with the materials and equipment I had on hand, but I thought I could at least take the leaf and cluster idea and translate them to something else.

While I was mulling this over, I realized that a few years ago, I bought several toggle clasps that look like leaves. 

Open toggle clasp...

And closed toggle clasp
Unfortunately, as cool as these look, they worked terribly as actual toggle clasps.  I tried making two different designs with them, and they kept coming open while I was wearing the necklaces.  NOT a good thing, unless you enjoy losing your jewelry.  One of the companies I buy supplies from has a precious metal scrap recycling program, and I thought these clasps were destined for that.

But then it occurred to me that they did look like leaves, and I was thinking of making silver leave earrings.  I connected the two parts of the toggle clasp with a short length of chain, added some stone beads to create a cluster of something (grapes?  berries), and added earring wires.  Voila!

Surprisingly lightweight and comfy
Continuing the plant theme, I've had a silver flower pin in my stash for several years.  I bought it at a thrift shop with the idea of turning it into a pendant, and I finally did!


This last piece incorporates an interesting shell fragment I picked up on the beach in North Carolina.  I often find thick shell fragments with multiple holes there, and I had been thinking it would be interesting to try to incorporate them in jewelry.  I picked up one with some purple on it.  But then after I brought it home, it sat around for a while because I wasn't convinced I could make a necklace I liked out of it.  Once I finally did, though, I was pretty pleased.

I think the polished fluorite beads and silver help to elevate the somewhat rough looking shell.  I don't know how durable this shell pendant will turn out to be--it's possible that the beading wire I strung  it on will wear away at it over time--but there is no way to know without trying, and I'll enjoy this necklace for as long as it lasts.


Wednesday, March 22, 2017

Slowly Cracking The Code


I made this necklace several months ago.  The design was inspired by the large purple and orange oval-shaped bead.  The bead in question was included as a free gift with a set of beads I had ordered from Z-Beads, and, funnily enough, it found a happy home in a necklace before the beads I actually ordered did!

The construction of this necklace was fairly simple, just stringing with no seed bead weaving or wire work.  But it took me several tries to get it to look the way I wanted.  When I first gathered beads together for this project, I didn't have the round dark purple beads or the tiny silver beads (which you may or may not be able to see in the picture).  When I first strung the other beads together, I thought it looked okay, but I didn't feel like there was any place for the eye to rest.  I added the tiny silver beads at that point to break up the larger beads.  It was an improvement, but then I decided that I needed the dark purple beads to bring out the dark purple stripes in the large bead.

I've been making jewelry for many years at this point.  I remember when I was younger, I ended up with a lot more pieces that were just okay, but weren't exactly what I was envisioning.  Part of the problem in the earlier years was that I didn't always understand what was lacking in the pieces.  If all the beads looked great sitting together, why didn't they look so great when they were strung or woven together?  Even when I did understand what was wrong, I didn't always know how to fix it.  Or--and I know this will sound like a justification for both buying and hoarding beads--I didn't have the materials on hand to fix the problem and became frustrated.

I'm trying to keep this all in mind now as I try to figure out sewing.  I did some sewing as a teenager, and started dabbling in it again a few years ago.  Sewing has mostly been a series of lessons for me so far.  Some of the garments I've made have been pretty wonky looking (zipper insertion is often the culprit in these cases).  Others have looked fine on their own, but did not look particularly nice on me once I tried them on.  (Unlike store-bought clothing, of course, there is nowhere to return handmade clothing that doesn't work out.)  I took a step back recently, though, and made a very simple top with no zippers or buttons to cause problems, and while it is by no means perfect, I'm pleased with how it turned out.  In fact, I'm encouraged enough that I am currently working on a tunic based on the same pattern.


Ira Glass has a wonderful quote that I think applies to almost any creative endeavor.  I like to keep it in mind when something I'm working on isn't quite panning out:

“Nobody tells this to people who are beginners, I wish someone told me. All of us who do creative work, we get into it because we have good taste. But there is this gap. For the first couple years you make stuff, it’s just not that good. It’s trying to be good, it has potential, but it’s not. But your taste, the thing that got you into the game, is still killer. And your taste is why your work disappoints you. A lot of people never get past this phase, they quit. Most people I know who do interesting, creative work went through years of this. We know our work doesn’t have this special thing that we want it to have. We all go through this. And if you are just starting out or you are still in this phase, you gotta know its normal and the most important thing you can do is do a lot of work. Put yourself on a deadline so that every week you will finish one story. It is only by going through a volume of work that you will close that gap, and your work will be as good as your ambitions. And I took longer to figure out how to do this than anyone I’ve ever met. It’s gonna take awhile. It’s normal to take awhile. You’ve just gotta fight your way through.”

I take this to mean that after some more time of sewing project lessons (and maybe even a few things I can wear in public), I might develop some sort of intuition for successful sewing, just as I've developed more intuition for making jewelry over the years.  In any case, it's nice to be reassured that a trail of lackluster creations may lead somewhere good.


Monday, January 16, 2017

Using Two Large Focal Beads In One Necklace


Sometimes interesting beads sit in my collection for a long time before I figure out the perfect way to use them.  I was given the pair of red patterned African trade beads that you can see in the necklace picture many years ago.  I liked them, but I had no idea how to use them.  They are large and somewhat heavy, which means that if you string them on the wrong part of the necklace, they will make the whole thing hang funny.  They are long, and the ends are not tapered.  This means that smaller beads may be visually swallowed up next to them.  Their holes are very large, which means that smaller beads may be literally swallowed up by them.  So they posed some challenges.  I had originally thought of making two separate chokers out of them, and maybe giving one as a gift.  But I thought that would be too easy and predictable; plus, my selfish nature took over, and I wanted both of the beads for myself.

I ultimately decided the beads would hang best in the front of center of any necklace.  That pointed to a double strand necklace with one bead on each strand, rather than, say, a long single strand necklace with a bead on each side.  I decided I wanted to incorporate bead weaving, but wanted the strength and security of beading wire.  So I stitched four seed bead tubes (herringbone stitch, if anyone is interested).  The two "top" tubes are shorter than the two "bottom" tubes; that is what creates the curve in the necklace.  On each side of the necklace, I partially stitched together the long and short tubes.  That is a detail that isn't very obvious in the picture, but I think it helps to maintain the necklace's curve.

Once I had done all of the seed bead work, I strung everything on beading wire.  I string some small seed beads inside both the African trade beads and the beaded tubes to help keep them centered on the wire.  The blue beads I strung right next to the African trade beads are large enough that they don't disappear into either the African trade beads or the beaded tubes.

Overall, I'm very pleased with how it turned out.  The one thing I'm not as happy about is the clasp.  I couldn't find any two-strand clasps with an appropriately rustic look, and decided my best option in terms of appearance was a toggle clasp.  Two-strand toggle clasps are horribly fiddly when you try to clasp them (I had originally thought it was just this necklace, but I made another, very different necklace with a two-strand toggle clasp recently, and it's nearly as bad).  So if I ever use that type of clasp again, I'm going to be very careful that everything near the bar portion of the clasp is tiny and/or flexible so that it can pass through the toggle as easily as possible.

I'm happy when beads I've had for a while finally find a home.  After recently organizing my collection, I concluded that quite a few beads need happy homes.  With luck, I'll find time to make that happen more often.  I got stuck in a busy rut in the fall and felt too overwhelmed to start anything.  I'm cranky when I don't have a project to work on, though, so I hope my recent reorganization will make it easier for me to find the things I want and start projects I can work on for at least a few minutes a day.

Thursday, November 3, 2016

Beach Pebble Necklace


Toward the end of our vacation in England last July, we spent an afternoon in Aldeburgh, a pretty seaside town on the east coast.  It was a very pebbly beach, unlike any beach I had ever seen before. In the face of such found object bounty, it was hard to keep myself from lugging ten pounds of pebbles home.  I did come away with a few, though, including a beige pebble with a hole located conveniently near one edge.  It's what I would call "nature's bead."  The hole actually contained some tiny pebbles that were wedged in tightly, but Scott helped me to clear them out.

I knew I wanted to try making a necklace with this find, but had a few things to think about.  First of all, this stone is relatively heavy.  That made me think it would be best to put it on a short necklace.  If the necklace were long, the stone would swing back and forth and hit my chest while I wore it, which wouldn't be very comfortable.  Also, the stone was thick enough that wrapping wire around it would have been challenging,  I knew from experience that it would be hard to get a good fit that didn't look clunky using wire, so I used short lengths of chain both to join the stone to the two sides of the necklace and to add the two beads that dangle from the bottom of the stone.  The last thing to think about was what beads to put with the stone.  The stone's large size pointed to using fairly large beads.  I also though that beads that didn't look too uniform or shiny would be best here--no strands of pearls or Swarovski crystals for this "nature's bead!"  I found some beads in my stash that I was very happy with--four large brown ceramic beads to echo the color of the stone, and a bunch of green striped African trade beads to add some color.

I linked all the beads together with fairly thick wire, thinking again about the size of the stone and trying to keep the rest of the necklace in proportion.  I found a toggle clasp with a shape that sort of echoes the stone's shape.  People won't usually see the clasp, of course, but I like the have my clasps harmonize with the rest of the piece if possible.

Once I thought of a design and selected my beads, the necklace came together fairly quickly.  I've been enjoying having another piece that reminds me of a fun trip.  It's a good pick-me-up on days when the next vacation seems impossibly far away.

Sunday, October 16, 2016

Making Vintage Jewelry More Wearable

I haven't posted in a while about anything I've made.  I was dragging my feet on photographing pieces, but I finally went ahead and photographed several today.

I inherited some of my paternal grandmother's jewelry when she died several years ago.  Today's piece of jewelry began with a fabulous fly pin that belonged to her.


There is wonderful detailing on the fly's wings, which, frustratingly enough, the picture doesn't show very well.  It also has a purple body.  Purple is my favorite color, and it was my grandmother's favorite, too.  I thought it was an extremely cool pin.

The only problem is that I'm not really a pin person.  I think it may be a generational thing--I've seen lots of older women wear pins with a great deal of flair, but when I try it, it just doesn't feel like me.  Truthfully, I can only think of one woman around my age who I ever saw wearing pins on a regular basis.

So the pin sat unworn for a number of years.  I finally decided it was time to remedy that and make a necklace from it, since I wear necklaces very regularly.  I started by buying a bail to convert the pin into a pendant.  The bail is simply a piece of tube that goes over the pin back with a large loop on top.  You can get these bails with either a vertical or a horizontal tube, depending on the direction of your pin back.  My pin was thus turned into a pendant.

I thought just putting it on a plain chain would neither do the pin justice nor having pleasing proportions.  So the next question was how to design a necklace that would complement the pendant without overwhelming it.  Inspiration came in the form of a package of seed beads that came as a free gift with some other beads I had ordered.  The seed beads were a mix of soft purples and whites with a matte finish.  I thought the soft, matte beads would allow the pendant to really shine.  I also thought that using matte beads would bring the overall shine of the piece down a bit, and make it easier to wear for everyday occasions.


I also wanted to incorporate metal into the necklace, so I bought gold-filled chain, wire, cones and a clasp.  Gold-filled is a good affordable alternative to gold.  I shudder to think how much solid gold would have cost.  I made four strands of wire-wrapped seed bead links, and used cones to link them to the chain.  I then connected the clasp to the ends and slid the pendant on.


Since the loop on the pendant bail is so large, I can easily remove the pendant if I want to wear the necklace without it.


And, since I left the pin back intact, I could remove the pendant bail and wear it as a pin again if I ever wanted to.  I'm glad that in one form or another, the fly pin will get worn again.

Thursday, December 17, 2015

Some of My Recent Creations

I am mostly packed now, and anxiously awaiting my trip home.  I find it hard to be very productive during these times.  For one thing, I always feel antsy before big trips.  Also, once I have something packed, I don't feel like unearthing it again until I reach my destination.  So, now seems like a perfect time to document some of the pieces of jewelry I made this semester!

Scott gave me this lovely silver bead with a gingko leaf as a gift some time ago.  It was made by Anne Choi.

I didn't think to photograph just the bead before making the necklace!
As is often the case when I receive a special bead, it took me some time to decide how to use it.  I received some unexpected inspiration when we visited Austria last spring.  One evening, when we went out to dinner, a woman at the next table was wearing an amazing necklace.  It was chain with long metal beads added in such a way that they rustled like leaves.  I knew then that I wanted to incorporate that concept into whatever I made with the gingko leaf bead, but wasn't sure how.  I decided that I probably wanted to use green beads of some sort to echo the leaf theme, but when I started experimenting, I discovered that may green drop-shaped beads didn't fit very neatly onto jump rings.  I finally tried the beads you see on the tassel below the bead with some jump rings made of fairly thin wire, and had success!  I didn't have very many of these particular jump rings, and I didn't feel like trying to source more exactly like them, so I decided to be content with just a small section of the necklace rustling like leaves.  One thing I like about the beads I ended up using is that they are shaped sort of like gingko leaves.

The entire necklace!
I beaded a ring to create a bail for the gingko leave bead + tassel.  I used cellini spiral (a variation of peyote stitch that incorporates different sizes of beads to create a spiral) for the rope it is on.  I added some spiky beads near the front of the necklace, both for added texture and to keep the pendant in place (and keep the clasp from migrating to the front of the necklace).

Following the theme of using different sizes of beads, I also made this bangle.


This time, I arranged the different sizes of beads in a different sequence so that instead of getting a spiral, I have more of a zig-zag or bumpy effect.  I'm looking forward to wearing it once I no longer have to wear long sleeves every day.

For a quicker project with less bead weaving, I designed a necklace with this bead that I bought from a coworker a few years ago.

Again, I didn't think to photograph the bead on its own before adding anything to it.  Check out the detailed barnacles on it!

I originally had grander plans for the necklace, but eventually decided that I didn't want the large seashell bead to be lost in a sea of other things.  So I ended up with a single-strand necklace with two glass beads covered in smaller beads, and everything else fairly simple.


One of the many things I'm looking forward to back home is slightly better equipment to take pictures of my jewelry.  The kitchen window sill and I had a good run, though, I suppose.  My beading projects provided a welcome distraction from some of the more challenging aspects of this semester, and as has happened many times in my life, I was grateful to have a portable hobby.

Monday, August 3, 2015

Necklaces From Souvenirs

I think the fact that I associate summer with travel must have inspired me to make two necklaces out of souvenirs this summer.  The first one was one I had been planning for months.  It incorporates nine souvenir squashed pennies from places in North Carolina--a great thing to wear when I miss home!  These were all squashed pennies that either I collected myself or that my parents collected for me.  I had to wait until I was stateside from the summer to work on that necklace because I needed tools and space to punch holes, cut lengths of tube, and create tube rivets for each one.  That part was the time-consuming part.  The finished necklace makes a fun jangling noise when I wear it.


The second necklace features a large pendant I bought in Uzbekistan.  Actually, I think it has been used as both a pendant and a brooch in the past--there is a large safety pin attached to the back, and I've been trying to decide if it bothers me enough to remove it.  When we visited Uzbekistan, I decided I would buy a piece of jewelry if I found something I loved that looked very different from jewelry I had seen elsewhere.  This pendant definitely fit the bill.  To make a necklace for it, I stitched two beaded tubes for the sides of the necklace, and strung the pendant on a length of chain between them.


The pendant is sitting at an odd angle because of the safety pin on the back.
I'm happy with how both necklaces turned out, but I think what I like the best is that they both have personal significance to me, since they remind me of places I have visited.  I can wear them on days when not much seems to be going my way, and remember fun travels I've had.

Monday, May 25, 2015

Two Necklaces and a Bracelet

With various projects that aren't related to beads (and, well, my job), I didn't have too much time for beading during the semester.  Now that the semester is over, I think I've made up for lost time.

The first project I finished was one I had been thinking about for a long time.  Scott got me a wonderful, large, colorful pendant as an anniversary gift a few years ago.


I loved it, but it took me a long time to figure out how to use it.  I think very large pendants usually benefit from being surrounded with large beads and design elements.  At the same time, I didn't want the surrounding beads to detract from the pendant.  I ultimately ended up stitching beaded triangles in colors that complemented the pendant, and stringing those in sections along the sides of the necklace.  Other beads include vintage black glass beads; drop beads in clear, yellow, and brown glass; and large pink seed beads. I think the beaded triangles add a lot of visual weight without actual weight, which makes me happy when I wear the necklace.

Sorry for the questionable photo--I miss my light box!

The next necklace I made incorporated a small octopus pendant made by Cynthia Thornton that I had been unable to resist.  This pendant posed a different design challenge.  It is fairly small and dainty, and I didn't want the surrounding necklace to overwhelm it.  However, I didn't want the necklace to be underwhelming, either.  My compromise was to include a double strand section at the front of the necklace.


The beads I used are labradorite "chip" beads, which are much prettier in person than in these photos.  I often find chip beads difficult to work with because of their irregular shapes, but in this case, they helped me achieve the natural look I was going for.  The octopus rests on a small length of chain (from my chain scraps, yay!).

The most recent thing I made was a narwhal bracelet.  Green Girl Studios makes wonderful metal (mostly pewter) beads.  My favorite ones feature animals, and I was very excited when they came out with a narwhal design.  Because of the placement of the holes, I thought a bracelet made the most sense.  I decided to dip into my collection of vintage glass beads and made lots of wired dangles with those and purple niobium headpins.  This was my first time working with niobium, and I liked the contrast of a type of metal I think of as a more modern design element with my vintage glass beads.  Also, I tend to hoard my vintage glass beads, and it was oddly liberating to use so many on one project.


Wishing everyone time for the hobby of your choice!

Sunday, February 22, 2015

Shark Tooth Necklace

Given the crumminess of the weather here, I think it's time for another beads and jewelry post!  I'm lucky to have hobbies that can be done inside.  I think these hobbies have kept me from going too stir crazy this winter.

When I was in North Carolina for the holidays, Scott, my parents, and I went to this fossil museum.  The museum itself is a nice little museum, and well worth a look if you happen to be in the area.  My favorite part, though is the fossil pile outside.  Periodically, someone brings gravel from a local phosphate mine.  Anybody who wants to can comb through the pile and take any fossils they find.

Despite some light rain, we decided to have a look.  I found a couple of nice shark teeth in the pile, one of which had a small point on each side, making it ideal for wire-wrapping.  I decided to make a necklace.

I confess that I resorted to using my shirt as a background for this photo, hence the sleeve dangling over the window sill.
First, I wire-wrapped the shark tooth.  It took several tries to get it how I wanted it.  Maybe I just need more practice wire-wrapping irregularly shaped objects.  Then, I made the five chain maille triangles out of jump rings.  I considered various designs, but thought that the triangles echoed the shape of the shark tooth.  I connected these triangles together using obsidian beads I purchased a few years ago.  It's hard to tell from my photo, but these beads have sort of a golden undertone.  It reminds me of the obsidian I saw when I studied in Mexico years ago.  Finally, I used a length of chain in the back of the necklace and attached a clasp.  On the whole, I'm very pleased with how it turned out.  I'm considering shortening it slightly, but may leave it as it is.  The only problem is that one of my chain maille triangles keeps want to turn upside down while I wear it, but I don't know if anyone besides me notices that.

Aside from my beading endeavors, there isn't too much to say here.  I mostly stay in my building these days except for working or going out to restaurants.  We finally made it to a local Korean chicken restaurant that people have been raving about.  It had other types of food, too, but it seemed that the focus was on chicken.  Think of BW3's, except good.  :)  We also went out for Georgian food last night, which I always love.  I have no idea how typical this is, but this restaurant has a dish with thinly sliced eggplant wrapped around ground, spiced walnuts.  I'll need to learn how to make this, whenever I'm in a kitchen that has a functioning food processor again.

Hope everyone is having a great weekend and staying warm!

Thursday, November 13, 2014

Another Post About Beads!

This post doesn't really have much to do with Kazakhstan, although it does feature a necklace that I completed in Kazakhstan.  As I believe I've mentioned elsewhere, it took quite a while for me to be reunited with all the beads I shipped over here.  I did bring the makings of a project to work on after this one because I knew I would want something to calm my nerves and keep me from fidgeting.  It took a while to complete this one because my job and various non-beady projects (like this blog!) keep me pretty busy, but here it is:


I have had those large, patterned rectangular beads in my stash for years, but it took me a long time to figure out how to use them.  I wanted to combine with with something else that looked bold, and eventually, I thought of a short strand of long, two-tone amethyst beads I purchased at a show years ago.  I ordinarily find stone chip beads difficult to work with, but in this case, I thought they would combine well with the somewhat irregular appearance of the long amethyst beads on the bottom strand of the necklace.  I made several beaded beads to complement the amethyst, some of which are two-holed beaded beads to keep the two strands of the necklace roughly parallel to each other.  I rounded this out with tiny Thai silver beads.

I actually finished this necklace once, but then had to take it apart and restring it because I accidentally made it too short the first time.  Oops.  I didn't want it to be a choker in the worst possible sense of the word!

I sometimes find it difficult to live someplace where new beads aren't readily accessible.  When I get an idea, I want to start working on it right away, not start sourcing some material.  On the other hand, though, maybe being away from obvious sources of new beads will help me to use some of the beads I've been hoarding for years and test out some of the ideas I've had in the back of my mind for a long time.  It'll be an interesting experiment.

Thursday, August 14, 2014

Dark Bloom Challenge

Today's post will have very little to do with Kazakhstan.  Don't worry, though--I'm sure I'll have more (mis)adventures soon to write about.  Today's post has to do with BEADS which I think must be nearly as fun anyway.

While we were still in the United States, Andrew Thornton announced his Dark Bloom Challenge.  Andrew has created many of these fun challenges in the past.  In essence, he creates a limited number of kits which include a good number of beads in a certain color palette, finding(s), stringing material, and a mystery component.  The mystery component this time was a lovely purple polymer clay coin pendant, which you can see here.  Each participant can use as much or as little of the kit as they want, and then everyone who wants to shares their creations.

When Andrew announced this kit, I loved the fact that he included so much purple.  Also, I thought I could use a distraction from the stress of an international move.  This was true up to a point.  As anyone who has ever moved anywhere knows, almost everything takes longer than you think it will.  As a result, I wasn't able to put as much thought into the planning of my creation as I would have liked.  I'm very pleased with the end result, but I didn't incorporate as many beads from the kit as I would have liked.  When Andrew emailed me and the other participants about an "extension" for our projects, I thought I might be able to remedy that by creating a second piece.  I came up with an idea in my mind for a beautiful bracelet, which I was really excited to make.  But--wouldn't you know it--the beads from my own stash that I needed to complete it turned out to be in a box that hasn't arrived yet.  Interestingly, there seems to be very little correlation between shipping dates and arrival dates for my boxes.  We shipped over a two week period; the last box I shipped arrived yesterday, whereas the first one is apparently still traveling the world or chilling in the customs office.

I made a necklace for my creation.  I started by beading a length of spiral rope stitch using vintage purple and gray seed beads from my collection.  I then made a sort of two-hole beaded bead using peyote stitch to divide the beaded rope into two sections and create a u-shaped space to hang the polymer clay mystery component.  After than, I created a beaded bail for the mystery component.  Finally, I attached the clasp (which came from the kit), and embellished the beaded rope using small glass beads from the kit and some of my own seed beads.

Here are a couple of pictures.  I apologize that the picture quality isn't great.  The light box which I would normally use to take pictures of my jewelry is currently in my childhood bedroom.  It's rather large, even when folded up, but I may try to fit it into a bag and bring it back here with me when I'm home next.  I took pictures on my windowsill, hoping that the natural light would help, but, well, you'll see...

My necklace!

Close-up of the mystery component polymer clay pendant
Update:  I didn't have this information yesterday due to the time difference between the US and Kazakhstan, but here are the links for the other participants:

Andrew Thornton, Laurel Ross, Alison Herrington, Geri Colgrove, Crystal Lombardo Farrell http://www.andrew-thornton.blogspot.com/